U-Boot Environment Variables
Sachin Verma
in ubootDas U-Boot is a popular bootloader amongst Embedded systems. This wide adoption of U-Boot is hardly surprising given the number of architectures and platforms supported by it. U-Boot has a flexible compile-time configuration setup. You can select different features and drivers via config options and build a custom bootloader image for your platform. U-Boot flexibility is extended at runtime as well. Using U-Boot environment variables you can influence the program execution flow.
U-Boot comes with a CLI (command line interpreter) having basic scripting capabilities. This scripting ability combined with U-Boot environment variables can be used to create some powerful booting scenarios. This ability to manipulate program behavior using environment variables is beneficial for both development and production setups alike. During development we strive to test all possible paths for loading and booting images for our platform. So, you may try to load linux kernel image from a local storage (flash, SDcard, USB or eMMC etc), or access it over network (NFS, TFTP, etc). U-Boot just makes your life easier as a developer. You just need to tweak the scripts combining environment variables in a fruitful way. Production images also need some versatility, when product OS images need upgrade, the bootloader must be configurable to fetch the images from different sources.
U-Boot has a number of system variables that you can modify to achieve the desired result. For example, on certain systems initrd images loaded at top of DDR may not be accessible to Linux kernel. To counter this, you can instruct U-Boot to load initrd at a lower DDR address. You can do this by setting the environment variable initrd_high. Another common example during development is the presence of different network configurations. At your home setup you may be working on a static IP configuration using nfs. But, when you are out for a demo at a client location you only have a DHCP available with images kept on tftp server. U-Boot is highly configurable for such scenarios as it gives you so many options. You can change network configuration, modify IP addresses of image servers, gateway server with the help of environment variables.
you could assign console over serial port or you may use netconsole or usbtty if you may wish.
So, What is this U-Boot environment ?
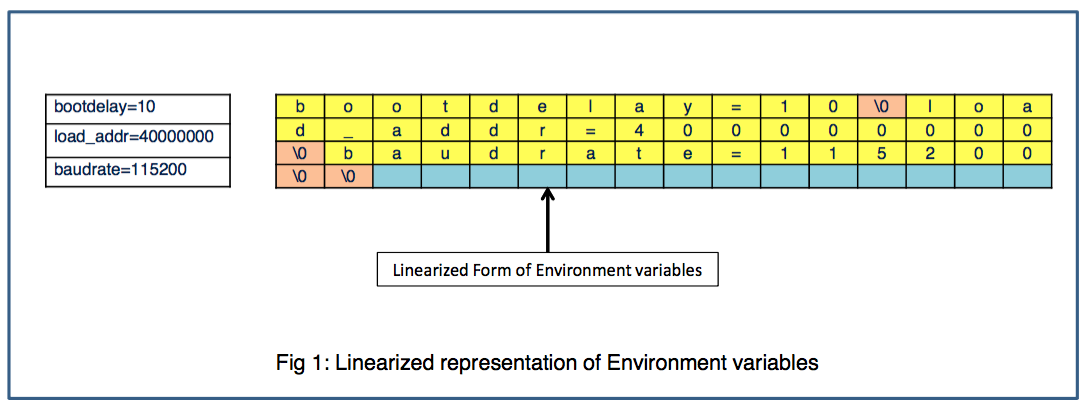
A simple answer to this question would be : "A collection of name=value pairs". Here, name refers to the name of the environment variable to which we wish to assign some value. This "value" could be of any type: string, hexadecimal, boolean etc. Whatever be the type of the value, it is converted into string before being stored in a linearized environment data block. Each environment variable pair ("name=value") would be stored as a null terminated string. So, the collection of many environment variables is nothing but a null separated list with double null terminator. Figure 1 illustrates how the list of strings is actually stored. Left hand side just a logical representation of environment variables. Whereas if you see the right hand you can see that the variables have been flattened and written in a serialized form.
How is the environment stored?
U-Boot has 2 types of persistent environments
- Default Environment (Compiled-in, Read-Only)
- User Supplied Environment (Flashed in external storage, writable)
Default Environment (Compiled-in, Read-Only)
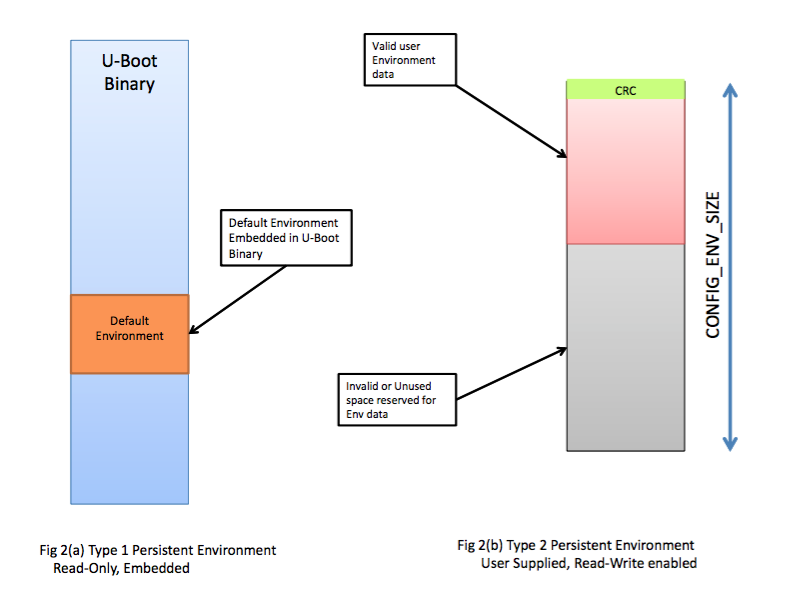
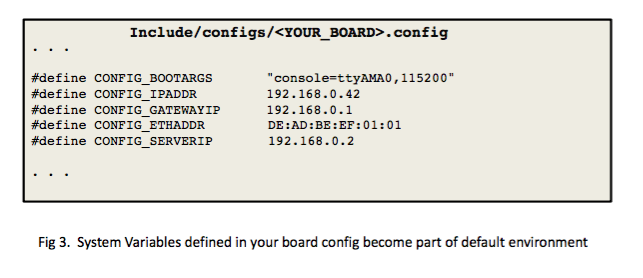
Every U-Boot binary has a default built-in environment of its own (See Fig 2(a)). During compilation, a character array called _defaultenvironment is embedded in to the U-Boot image. This character array stores the environment variables as a list of null terminated strings with a double null terminator. The contents of this array are populated conditionally based on the config options selected for your board. Environment variables which are commonly used can be enabled by defining the corresponding CONFIGS's in your board config file (include/configs/<YOUR_BOARD>.h). Fig 3 lists some commonly used options which once defined would make their way into default environment of your board.
Apart from the standard variables used across boards you may wish to add certain environment variables specific to your board or convenient to you. You may for instance want to embed the revision number of the board in to this environment. You could do this by defining all these variables in a macro called CONFIG_EXTRA_ENV_SETTINGS in your board config file.
#define CONFIG_EXTRA_ENV_SETTINGS \
            "board=" XSTR(BOARD) "\0" \
            "load_addr=" XSTR(CONFIG_SYS_LOAD_ADDR) "\0"
You must remember that default environment is "read-only" as it is part of U-Boot image itself. Vendors normally keep some essential system variables as part of this environment.
There are good reasons to keep a default environment as part of the image:
a. Since it is read-only, you always have a default state to revert to.
b. During early bootup, user supplied environment(defined next) may be inaccessible or must not be used because of security concerns.
c. User Supplied Environment may be inaccessible due to:
- Storage device malfunction.
- Environment data corruption.
You must not keep too much data in to this default environment as it directly adds to the weight of the binary. Only keep critical system variables in this environment.
User Supplied Environment (Flashed in external storage, writable)
Typically, vendors would flash an environment data image to an external storage present on your board. The format of this prebuilt environment is again same i.e. linearized list of strings, but there is a 4 byte CRC header prefixed to it. This CRC is computed over the environment data. Figure 2(b) illustrates such an environment blob with a CRC data, followed by valid environment data and invalid one after that. Total size of this environment data is fixed to CONFIG_ENV_SIZE during compilation. So, if your environment usage exceeds this size you would need to recompile your U-Boot binary after increasing CONFIG_ENV_SIZE. If you do not increase the size, U-Boot would refuse to save the environment variables.
You may decide to keep this environment in any of the external storage, but you must configure the board config accordingly. U-Boot must know which storage and at what offset would be used to keep the user environment. U-Boot provides a number of options to configure location of Environment data. U-Boot has infrastructure to access environment stored in serial flashes, NVRAM, NAND, dataflash, MMC and even UBI volumes. You can obtain more information on how to use these CONFIG options from the U-Boot documentation. Since default environment size has to be minimized, most of the environment variables are stored here. Certain storage technologies like Raw NAND flashes are inherently unreliable. To combat such possibilities(including power failure) and for robustness in general, you can also configure a Redundant user environment. You can configure the location and size of this duplicate environment data as well in your board config.
Saving Environment
Out of the 2 default environments (default and User) only User is Writable. So, whenever you modify a variable and issue a saveenv command, that variable would end up in User environment.
When you do saveenv, U-Boot would:
- sort the list of current environment variables
- convert them to a linearized list of strings
- compute CRC over this data and burn the environment back at its fixed location in storage.
Creating a Pre-Built User Environment
U-Boot provides a utility named mkenvimage which can be used to generate an environment blob suitable to be flashed.
mkenvimage needs atleast 2 inputs to create the blob:
- Environment variables in a text file (only one env "name=value" string on each line)
- Size of the environment blob in bytes (Remember, this must comply with the
CONFIG_ENV_SIZEyou have defined in your board config).
For example, if my env data file is called my_env_data.txt, and sizeof desired env blob is 16384 (16 KiB), then i would use the following command:
$./tools/mkenvimage -s 16384 -o env_blob my_env_data.txt
you can see the dump of the environment blob using the od command
$ od -t x1c env_blob

0000000  0d  d2  49  96  62  61  75  64  72  61  74  65  3d  31  31  35
         \r 322   I 226   b   a   u   d   r   a   t   e   =   1   1   5
0000020  32  30  30  00  62  6f  6f  74  64  65  6c  61  79  3d  31  30
          2   0   0  \0   b   o   o   t   d   e   l   a   y   =   1   0
0000040  00  6c  6f  61  64  5f  61  64  64  72  3d  30  78  34  30  30
         \0   l   o   a   d   _   a   d   d   r   =   0   x   4   0   0
0000060  30  30  30  30  30  00  00  00  00  00  00  00  00  00  00  00
          0   0   0   0   0  \0  \0  \0  \0  \0  \0  \0  \0  \0  \0  \0
0000100  00  00  00  00  00  00  00  00  00  00  00  00  00  00  00  00
         \0  \0  \0  \0  \0  \0  \0  \0  \0  \0  \0  \0  \0  \0  \0  \0
*
0040000
This environment data blob must be flashed at the predefined offset in the storage device. You can use U-Boot, Linux or any other flasher to burn this blob.
Relocation of Environment data to RAM
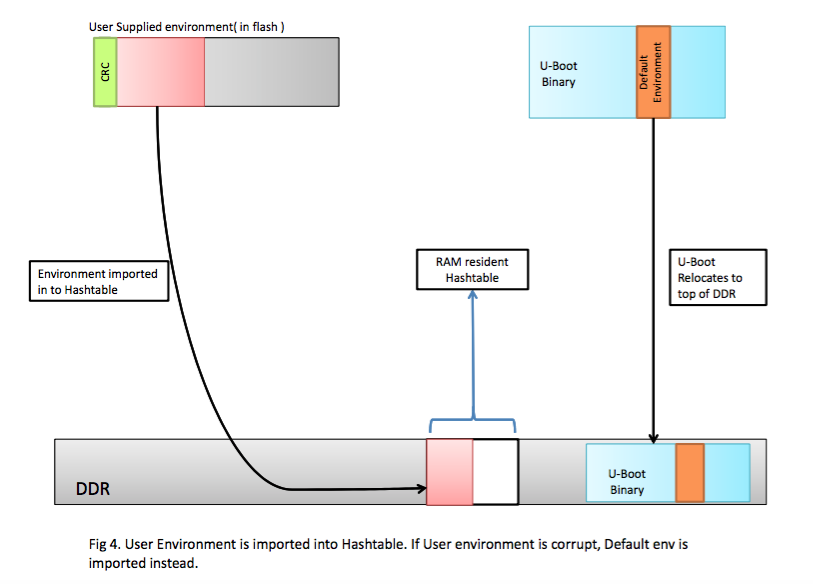
During early boot when U-Boot has not relocated to RAM, it uses the linearized form of environment data (as shown in Fig 1). But once, U-boot has relocated to RAM this linearized form is no longer used. Instead, U-Boot imports all such env data stored from persistent storage into a RAM resident Hashtable. If User supplied environment is good(i.e. CRC is OK), then it is imported from flash to RAM. Otherwise, U-Boot imports the default compiled-in environment to this hashtable. Fig 4 shows how User Environment is imported in to Hashtable, whereas U-Boot along with its default environment relocates to top of RAM. In case User Environment is corrupt or inaccessible, uboot would import the default environment in to Hashtable.
The use of Ram resident data structure (Hashtable) is important for various reasons:
- It boosts performance as we are manipulating variables in RAM and not in flash.
- You have to manipulate data only in RAM and need not access some slow flash driver( and deal with the associated complexity ).
- It allows U-Boot to deploy type checks and access control attributes on different variables while still keeping the persistent storage form simple(linear list).
Once environment has relocated to ram ( into the hashtable), all commands operating on environment variables would only be working on this hashtable. U-boot would not touch the environment variables stored in the persistent storage at all(unless it needs to save the env).
Each environment variable entry inside the hashtable is represented by a data structure called "struct entry" (See Fig 5). Apart from the members "key" and "data" which correspond to "name" and "value" in linearized representation of data, we have members called "callback" and "flags". "flags" is of integer type and is used to implement type check and access control. "callbacks" is the callback function associated with this environment variable. If defined, this callback handler would be invoked whenever any operation (like add, delete or modify) is performed on this environment variable.

How to Control/React to environment variable modification?
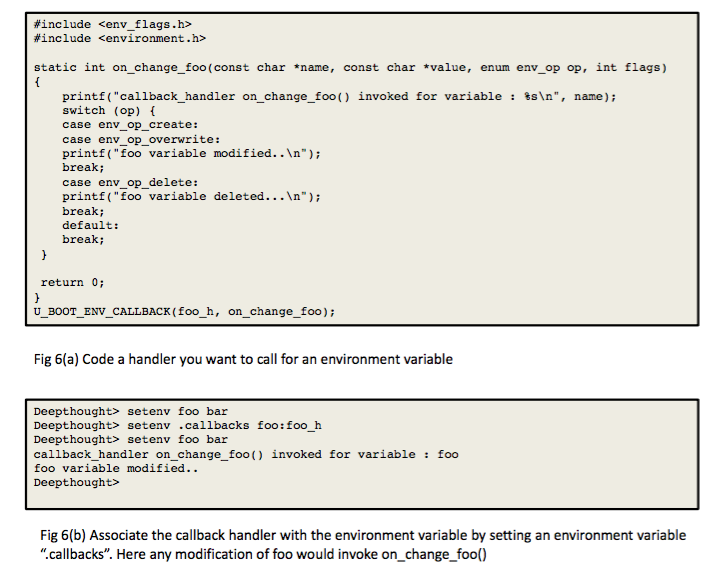
At times you may want to do your own runtime configurations. You may want to react (accept, reject, or produce some side effects) to the changes done to some environment variable. For such use cases, U-Boot provides a mechanism of deploying callback handlers. You can associate a callback function with an environment variable. As a first step, you have to register a callback handler with U-Boot. This function would be called whenever you do any modifications to the environment variable. Fig 6(a). shows a sample code to register a callback with U-Boot. you can place such a handler code in your board specific file. The macro U_BOOT_ENV_CALLBACK registers the callback function on_change_foo with the handler named foo_h. Your handler is now registered with U-Boot with the name foo.
Now, you need to establish a link of this registered handler with an environment variable. If you have a look at the "struct entry" in Fig 5(a), you can see that there is a member named "callback" ( a function pointer) for each environment variable. U-Boot would invoke this handler before commiting modified environment variable to the hashtable. You can make this association of callback handler with env variable either at compile time or at runtime. For doing compile-time association you need to define the config option "#define CONFIG_ENV_CALLBACK_LIST_DEFAULT foo:foo_h" in your board config file.
You can also do runtime association as depicted in Fig 6(b). Here i have created a new environment variable .callbacks, which is a standard U-Boot system variable to make such associations. I have deployed a handler named "foo_h" for the environment variable "foo". Once this registration is done, whenever you do some modification to variable "foo", function "on_change_foo()" would be invoked. You can now deliver your reaction to different types of actions(env_op_create, env_op_overwrite, env_op_delete).
U-Boot already deploys similar handlers for managing console changes, splashimage etc.
Type and Access Control of Environment variables
There are certain environment variables which you want to use but do not want to do casual modifications. For example you have an environment variable "serial#", you definitely want this variable to be read-only. You want automatic rejection of any attempt to change it. Another such example is the MAC address of the device. Again you want to keep this variable as read-only or at worst write-once. U-Boot supports different access modifiers "any", "read-only", "write-once", and "change-default" (see Fig 5). U-Boot Hashtable representation of env variables has a member "int flags" (see fig 5). member "flags" is used to keep a bitmap specifying the access permission associated with variable. So, Whenever any modification attempt is done on variable , it must comply with the access permission, otherwise U-Boot would reject the changes.
Another problem faced by users is the basic sanity check of environment variable type. Since linearized form of environment only keeps strings, Uboot needs to make sure that it can do some kind of type checking before assigning value to a variable. To address this issue U-Boot makes use of some predefined types like "string", "decimal", "hexadecimal", "boolean", "IP Address", "MAC address". There are corresponding codes for these type modifiers: "s", "d", "x", "b", "i", "m". Again, U-Boot stores this type information of variable in "flags" as a bitmap as shown in Fig 5.
You can associate type and access control to a variable either at compile-time or at run-time. For compile-time association you need to define a config #define CONFIG_ENV_FLAGS_LIST_DEFAULT foo:sr in your board file. For runtime association, you can define an environment variable .flags as fig 7. Here, i am associating an environment variable foo with type s (meaning value is a string) and access control r (meaning it is read-only). Once deployed, if you try to modify variable "foo", U-Boot would reject your request. Also, if value is not of specified "type", your update to env variable would fail.
Environment variables like MAC address make use of type m. This would make U-Boot do a sanity check on the value entered by user, to confirm if the value is indeed a valid MAC address.

Modifying U-Boot "User Environment" from Linux
U-Boot environment variables can be added, modified or deleted from Linux as well. U-boot provides a set of utilities called fw_printenv and fw_setenv to do the job. First you need to compile these utilities for Linux. Fig 8 shows the compilation steps for the utility. Here, i am cross compiling it for an ARM platform. It is a multicall binary. So, you need to make a symlink named fw_setenv to binary fw_printenv.

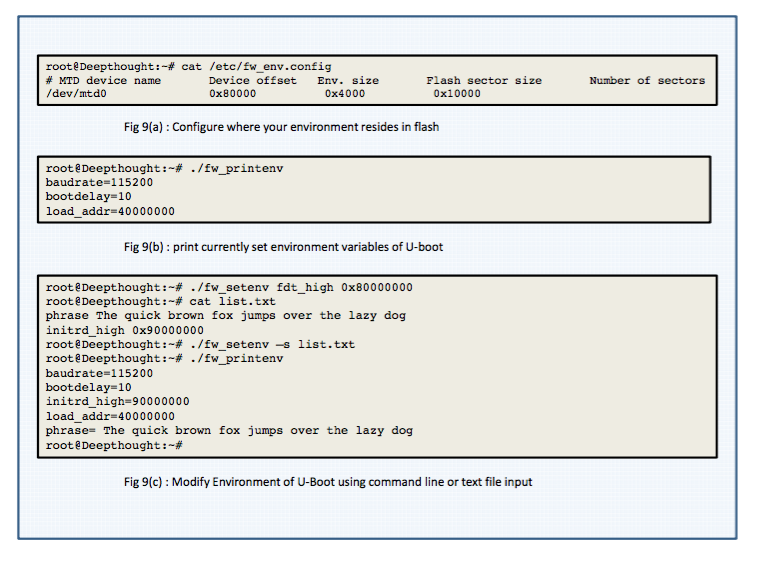
To modify the environment, you need to first boot into linux on the target board. Now, you need to create a file /etc/fw_env.config. This file contains all the information needed to specify the location of the Environment data blob. Fig 9 shows my configuration file. I kept my environment in a SPI flash which appeared as /dev/mtd0 to my kernel. My Environment blob was configured at an offset of 0x80000 from beginning of flash and had a size of 0x40000. The size of each sector of my flash is 0x10000. This is all the information i needed to provide in order for environment manipulation utilities to work.
As soon as i keyed in the command fw_printenv, i could see the variables that i saved in U-Boot user environment appearing on my console.
you can also set the environment variables using fw_setenv. As shown in Fig 9, i make use of a text file (list.txt) containing the variables i want to set. The format is simple, the first whitespace after a name acts as a delimiter, the characters till the end of line thereafter are considered value for the key.
You can verify that the variables have been set by executing fw_printenv. These variables would now be visible from U-Boot as well.
Restoring Default Environment
Sometimes, after a lot of environment variable changes, you can corrupt the state. To restore sanity and get the original values of default environment you can make use of env command.
env default [-f] var [...]
Above command would forcibly reset the specified variables to a value from the default environment.
To restore complete environment from default, you may invoke the following command:
env default -aenvcommand is very powerful, you can use it import/export environment data from/to RAM.
Final Comments
U-Boot environment can act as a very useful runtime configuration tool. When combined with scripting it can make arduous task of development and testing of boot scenarios much simpler and fun to do.
References
- U-Boot source code (git://git.denx.de/u-boot.git)
- http://www.denx.de/wiki/U-Boot