Running Docker Containers on DigitalOcean
Sachin Verma
in docker container DigitalOceanIn my previous post, I covered how you can run docker containers on a Mac with the help of virtual machines (running locally using Hypervisors). That setup on virtual machines is good for understanding basic concepts of Docker technology. But, in a real world scenario you are most likely to run your microservices based applications on a Docker Host running somewhere on the cloud. Fortunately, the client utilities provided by the docker application on most development platforms (Linux, windows, Mac) makes it very convenient to setup this cloud configuration.
- Continuing with my setup from previous post, i would assume that you have "Docker for Mac" installed on your Mac and I would walk you through a small working demo on provisioning and launching a 'hello-world' container application on a
droplet( name for virtual machine instance inDigitalOceancloud ).
Step 1: Setup DigitalOcean
Signup for a DigitalOcean account
Like any cloud provider in order to use the DigitalOcean cloud you need to first register an account with their website.
You would need to add your billing credentials, verify your email address and you would be all set to go.
Create a 'digital-ocean-access-token'
Although DigitalOcean provides a nice dashboard and GUI on their website through which you could configure and launch a droplet. But, that is not what we are interested in. We want to orchestrate our DigitalOcean account and hence the droplets programatically. To that end DigitalOcean has an API which allows you to control all aspects of your droplet (virtual machine) through simple HTTP requests.
So go ahead and select API from the menubar on the DigitalOcean website and generate a new API token.
Copy this token somewhere and we will use this information later on.

Step 2: Setup Your Mac
Install
Docker for Mac. see my previous post detailing that.If you are on Linux or a Windows box Go ahead and install docker client utilities for that platform from the docker website.
Step 3: Provision a new Docker Host
As you can recall from my previous post,
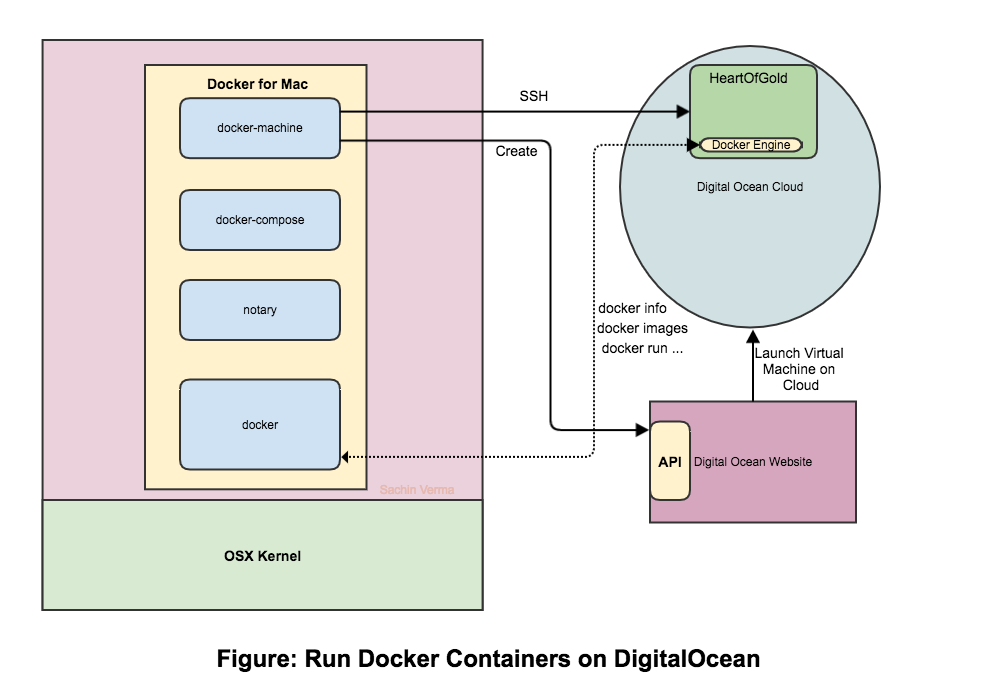
docker-machineis a client utility which allows you to provision a new Docker Host.Docker has a vast community and hence this utility has options to configure almost all cloud infrastructures in existence today.
docker-machinecommand gives you hundreds of options to craft a docker host machine of your liking on cloud of your choice.In our case the creation of a DigitalOcean droplet is as simple as following command:
$ docker-machine create -d digitalocean --digitalocean-access-token=<YOUR_API_TOKEN> HeartOfGold


Running pre-create checks...
Creating machine...
(HeartOfGold) Creating SSH key...
(HeartOfGold) Creating Digital Ocean droplet...
(HeartOfGold) Waiting for IP address to be assigned to the Droplet...
Waiting for machine to be running, this may take a few minutes...
Detecting operating system of created instance...
Waiting for SSH to be available...
Detecting the provisioner...
Provisioning with ubuntu(systemd)...
Installing Docker...
Copying certs to the local machine directory...
Copying certs to the remote machine...
Setting Docker configuration on the remote daemon...
Checking connection to Docker...
Docker is up and running!
To see how to connect your Docker Client to the Docker Engine running on this virtual machine, run: docker-machine env HeartOfGold
That's how simple it is!!. Just one line to launch the default machine.
You do not need to worry about the cost as by default,
docker-machineprovisions lowest configuration offered by DigitalOcean which happens to be512mbRam.
If you notice the output of the command above,
docker-machinecreates the necessaryssh keyto communicate with the machine it is about to provision and then issues an HTTP request to DigitalOcean server in the background. Once, the droplet is created on the cloud, it provisions the default OS image (Ubuntu) and then installs docker on to that Ubuntu machine.Also notice that all the certificates are stored on the local machine as well which would be used once we try to
sshinto the machine.you can see below a listing of the configurations and keys related to the newly created machine stored locally:
$ ll $HOME/.docker/machine/machines/HeartOfGold/

total 64
-rw-------  1 sachinv  staff  2746 Mar 30 00:59 config.json
-rw-r--r--  1 sachinv  staff  1038 Mar 30 00:59 ca.pem
-rw-r--r--  1 sachinv  staff  1078 Mar 30 00:59 cert.pem
-rw-------  1 sachinv  staff  1679 Mar 30 00:59 key.pem
-rw-------  1 sachinv  staff  1675 Mar 30 00:59 server-key.pem
-rw-r--r--  1 sachinv  staff  1119 Mar 30 00:59 server.pem
-rw-------  1 sachinv  staff  1675 Mar 30 00:56 id_rsa
-rw-------  1 sachinv  staff   381 Mar 30 00:56 id_rsa.pub
- In case you want to beef up or customise the configuration of your machine and the Operating System , you can do so with the help of the options available on
docker-machinecommand line and/or the bash environment variables.
Step 4: Lets inspect our newly provisioned Docker host residing on DigitalOcean cloud.
Set up environment variables for communication
$ eval "$(docker-machine env HeartOfGold)"
Lets see what variables are set
$ env | grep DOCKER
DOCKER_HOST=tcp://xxx.xxx.xxx.xxx:2376
DOCKER_MACHINE_NAME=HeartOfGold
DOCKER_TLS_VERIFY=1
DOCKER_CERT_PATH=/Users/sachinv/.docker/machine/machines/HeartOfGold
Lets SSH to our new Docker host
docker-machineutility can be used to do seamless communication with the Docker host using ssh.
$ docker-machine ssh HeartOfGold
Welcome to Ubuntu 16.04.2 LTS (GNU/Linux 4.4.0-66-generic x86_64)

 * Documentation:  https://help.ubuntu.com
 * Management:     https://landscape.canonical.com
 * Support:        https://ubuntu.com/advantage

  Get cloud support with Ubuntu Advantage Cloud Guest:
    http://www.ubuntu.com/business/services/cloud

10 packages can be updated.
10 updates are security updates.


*** System restart required ***
root@HeartOfGold:~#
- Voila!! i have logged in to my machine through ssh.
Step 4: Lets Run a test docker container on our new Docker host
Sachins-MacBook-Pro:DockerTest sachinv$ docker run hello-world

Unable to find image 'hello-world:latest' locally
latest: Pulling from library/hello-world
78445dd45222: Pull complete
Digest: sha256:c5515758d4c5e1e838e9cd307f6c6a0d620b5e07e6f927b07d05f6d12a1ac8d7
Status: Downloaded newer image for hello-world:latest

Hello from Docker!
This message shows that your installation appears to be working correctly.

To generate this message, Docker took the following steps:
 1. The Docker client contacted the Docker daemon.
 2. The Docker daemon pulled the "hello-world" image from the Docker Hub.
 3. The Docker daemon created a new container from that image which runs the
    executable that produces the output you are currently reading.
 4. The Docker daemon streamed that output to the Docker client, which sent it
    to your terminal.

To try something more ambitious, you can run an Ubuntu container with:
 $ docker run -it ubuntu bash

Share images, automate workflows, and more with a free Docker ID:
 https://cloud.docker.com/

For more examples and ideas, visit:
 https://docs.docker.com/engine/userguide/
- As you can see from the output, there was no container image by the name of
hello-world. Hence docker engine fetches image from docker registry and then executes that image.
Lets see what all docker images are there on our Docker Host
Sachins-MacBook-Pro:DockerTest sachinv$ docker images
REPOSITORY          TAG                 IMAGE ID            CREATED             SIZE
hello-world         latest              48b5124b2768        10 weeks ago        1.84 kB
- We can see the freshly downloaded
hello-worlddocker images downloaded on to our docker host.
Lets inspect what information does docker engine running on Docker Host gives us
Sachins-MacBook-Pro:DockerTest sachinv$ docker info
Containers: 1
 Running: 0
 Paused: 0
 Stopped: 1
Images: 1
Server Version: 17.03.1-ce
Storage Driver: aufs
 Root Dir: /var/lib/docker/aufs
 Backing Filesystem: extfs
 Dirs: 3
 Dirperm1 Supported: true
Logging Driver: json-file
Cgroup Driver: cgroupfs
Plugins:
 Volume: local
 Network: bridge host macvlan null overlay
Swarm: inactive
Runtimes: runc
Default Runtime: runc
Security Options: apparmor seccomp
Kernel Version: 4.4.0-66-generic
Operating System: Ubuntu 16.04.2 LTS
OSType: linux
Architecture: x86_64
CPUs: 1
Total Memory: 488.4 MiB
Name: HeartOfGold
ID: 3WQZ:422K:DVU6:OPRN:3FVX:TISX:ZZ3K:M992:JY7S:6FXH:43CN:PQPL
Docker Root Dir: /var/lib/docker
Debug Mode (client): false
Debug Mode (server): false
Registry: https://index.docker.io/v1/
WARNING: No swap limit support
Labels:
 provider=digitalocean
Insecure Registries:
 127.0.0.0/8
Going Forward
This article showed how easy it is to setup a docker host on a cloud infrastructure of DigitalOcean. Even though it is a toy example, it clearly demonstrates the level of integration that is currently available between container client utilities and the cloud infrastructure. Of course for a real world multi-container applications there are important issues like networking, security, databases, scaling and many others.
Building on this, in my next post i would show how you can write a multi-container application and connect it's various components.